Saturday, 16 August 2014

Kitty Macarons

A while back, my daughter came home from school asking for my help with her homework.  Her assignment was to prepare a food item, package it and advertise it to its best advantage. Hmm .... now what shall we prepare then? Cookies? Cupcakes? Brownies? ......  Ahhh .... Yes! Macarons!! That should be exciting! And to make our product more attractive we decided to make kitty macarons. Aren't they just adorable?


Colourful and cute kitty macarons
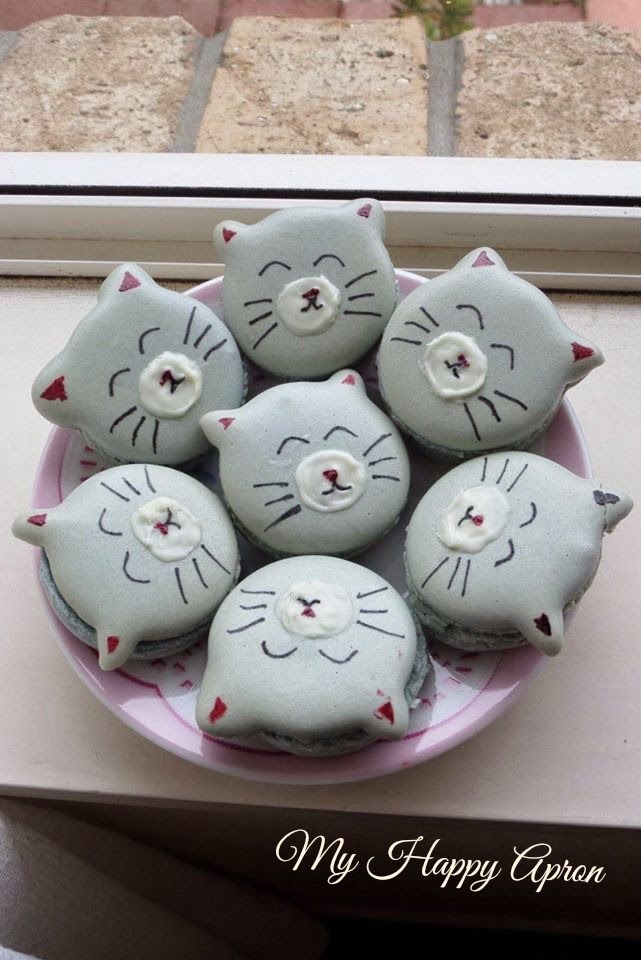
Meow meow meow ....

All packaged up with advertisement and ready to sell!


We had a busy but fun-filled weekend preparing the macarons and drawing cute kitty faces. Now why can't homework be this fun all the time?


Kitty Macarons
(Basic Macaron Recipe adapted from Macaron Fetish)

Yield about 24 macaron shells (12 filled macarons)

Macaron Shells
1 room temperatured egg white(39-40g)
50g icing sugar
30g ground almond
30g castor sugar
Drops of food colouring

Method:
1. Put ground almond and icing sugar in a food processor or a small blender. Blend them finely.

2. Sift the blended mixture and set aside.


3. With an electric beater, Beat the egg white, start from low speed and increase slowly to maximum speed. Beat until frothy (you will see lots of fine bubbles)

4. Now it's the time to add in the castor sugar, add half of the sugar, continue to beat in maximum speed for around 2 minutes, add in the other half, continue until you get very stiff peak.

5. Mix the dry ingredients into the eggwhites. This process is called Macaronage. Start folding with a rubber spatula. Add in drops of food colouring but not too much as it will cause the mixture to become too runny. When you get a smooth shiny mixture, stop folding, lift the mixture with spatula, if the mixture falls back slowly in the bowl means you're good to go. You could also check if the lines formed from the liften mixture, they should slowly disappear in within 30 seconds. At this stage you're good to go. Do not over fold, it will be too liquid and becoming very hard to pipe.

6. Line the baking tray with the parchment paper.

7. Fill your piping bag , pipe your macaron (about 2 cm diameter) it should spread a bit as it settles. The point should slowly disappear if the mixture is the right consistency.
If not you could hit the bottom of the tray to smooth the point out)


8. To make kitty macaron, I just use a toothpick to pull the batter slightly upwards to form two pointy ears.

9. Let your macaron sits for about 30minutes. This will depand on the humity in your house and the day. Try touching the macaron softly, after 30mins. it should not stick to your hand.

10. Heat your oven to 150 C on the (heating on the top only). When the oven is ready, put your macaron at the very bottom shelf. Bake for 12 minutes, check them in the mid time of 6 minutes, the feets should already start forming. Turn the baking tray to the opposite direction to allow even baking. When the 6 mins is up, change the heating setting of your oven to Bottom only. This will help cooking the macaron and rise the feet more. Bake for another 6 minutes. You can test if the macaron is cook, touch softly on the shell and when the macaron doesn't slide on the feet, it's cooked. if it's not add another 1 mins each time and check.

11. Let the macaron cool down before removing them. You could wet your working area and slide the baking sheet on it to speed up the cooling process, but do not let it sit there too long, if not the macarons will become soggy. Other wise you can leave them cool at room temperature and remove them.

12. To make kitty faces, use a toothpick to dip into black food colouring and draw on the macarons.


White Chocolate Ganache Filling
50g white chocolate
25ml fresh cream

1. Warm the cream over the stove, until it boil very slightly.

2. Remove the cream from heat, Add white chocolate, mix until the chocolate is melted completely and a smooth texture is obtain.


3. Refrigerate until firm and spread between the macaron shells.


Have fun and enjoy!

Friday, 15 August 2014

Rock Buns

Many years ago, not long after I started on a new job, I made some rock buns and brought them to work to share with my colleagues during tea break. My boss came over and I offered her some too. She tried one, ... said they were delicious, ..... couldn't help taking another, .... and then another. I guess they must have been addictive! They say the way to a man's heart is his stomach. I wondered then if it works the same for a boss?


Something quick, simple and easy to make to fill your cookie jar


Rock Buns
(Makes 20)

240g plain flour
2 tsp baking powder
90g butter, softened
90g castor sugar
120g sultanas
1 medium egg, lightly beaten
1 Tbsp milk
1 Tbsp castor sugar, extra

1) Preheat oven to 180°C. Line oven tray with baking paper.

2) Sift flour and baking powder into a large mixing bowl. Lightly rub in the butter with fingertips until the mixture resembles fine breadcrumbs. 

3) Add in castor sugar and sultanas, and mix until well incorporated.

4) Add in the beaten egg and milk and mix together to form a thick, lumpy dough. (If dough is too dry, add a teaspoon more milk to make the mixture stick together).

3) Drop rounded tablespoon of mixture about 5cm apart onto trays and sprinkle with extra sugar.

4) Bake for 15 minutes or until golden brown and well risen.

Stored in airtight containers, they can keep for up to 3 days.


Thursday, 14 August 2014

Chocolate Cream Cheese Cupcake

To be honest, I'm not such a big fan of cupcakes, especially those pretty ones with incredibly sweet icing toppings. I usually only made them for my daughter's birthday party or school events.

But I was instantly drawn to these chocolate cream cheese cupcakes which I saw in a recipe book. What's even better was that the pretty decorations on top of them were actually made out of natural nuts! No artificial food colouring or sweet sprinkles required to dress up these cute and pretty cupcakes! And with all my favourite ingredients in them, it ticks all the boxes ... how can I resist! Love 'em!


Chocolate Cream Cheese Cupcakes
(Makes 8)

Ingredients

40g Unsalted butter
125g Cream cheese
90g Castor sugar
2 Large Eggs, beaten
2 Tbsp Milk

Dry Ingredients
20g Cake flour
20g Cocoa powder
80g Almond powder
1 1/3 tsp Baking powder

For Chocolate Icing
125g Cream cheese
20g Butter, melted
40g Icing sugar
1 Tbsp Cocoa powder

For Decoration
Almond Flakes
8 Whole Hazelnuts

Method

1) Preheat the oven to 180°C. Line a 12-hole muffin pan with 8 cupcake cases.

2) Sift the dry ingredients together in a bowl and set aside.

3) Place melted butter and cream cheese in a bowl and beat with a mixer till creamy.  Add in the  castor sugar and continue to beat until the mixture turns pale.

4) Add in the beaten eggs in 2 or 3 intervals as you beat the mixture, followed by the milk.

5) Add 2 tablespoon of the dry ingredients and beat into the mixture. Then using a spatula, gently fold in the rest of the dry ingredients.

6) Pour the batter into the cupcake cases until three quarter full. Bake for about 20-25 minutes. 

7) To make chocolate icing, beat together cream cheese and melted butter till creamy. Add in icing sugar and cocoa powder.

8) Fill chocolate icing into a piping bag fitted with a star nozzle. Pipe on top of the cupcakes and decorate with almond flakes and a whole hazelnut to form a flower.


Wednesday, 13 August 2014

Chocolate Eclairs

I remember there was a time when I went to a night market with my friend and her daughter and we came upon this stall selling chocolate eclairs. They looked very tempting but rather pricey. Nevertheless, my friend bought some for her girl to try. Disappointingly, it was quite dry and did not taste as good as it looked.

The next day, I invited them over for afternoon tea at my place. Pondering on what to serve for tea, I suddenly had an idea and decided to try my hand at making some eclairs myself. Surprisingly, it wasn't that difficult to make as long as you follow the right technique. I was thrilled that they turn out well and got a thumbs up from my friend's daughter! 

Today I decided to take a step further and dress up my eclairs with colourful melted chocolates. The result was ....  yummylicious, candylicious, chocolicious, "can't possibly stop at one" delicious chocolate eclairs!


My girl insisted that I should post this photo of her eclair creation!


Chocolate Eclairs
(makes 16)

Ingredients

For the choux pastry
1/2 tsp salt
1 1/2 tsp castor sugar
125g plain flour
150ml water
60g unsalted butter, chopped, at room temperature
3-4 large eggs, lightly whisked

For the chocolate topping:
50g dark chocolate, melted
100g milk chocolate, melted
red food colouring

For the cream filling:
300ml thickened cream (double cream)
1 tbsp icing sugar


Method 

To make choux pastry :

1. Preheat the oven to 200°C. Line 2 baking trays with non-stick baking paper.

2.  Combine the salt, sugar and flour in a bowl and set aside. Put water and the butter in a medium saucepan and bring slowly to the boil; the butter should melt before it comes to the boil. 

3.  Working quickly, remove the saucepan from the heat, add the flour mixture all at once and stir vigorously with a wooden spoon to combine. Return the saucepan to low heat and cook, stirring vigorously, for about 1 minute or until the mixture forms a smooth, thick mass that comes away from the side of the pan. Do not overbeat the mixture or the pastry will not rise properly.


4.  Transfer the mixture to the bowl of a stand mixer fitted with the paddle attachment and set aside for 5 minutes or until cooled slightly. Gradually add the egg, beating constantly and ensuring it's mixed in well before adding more. Continue beating in the egg until the mixture is glossy and falls heavily from the beaters. The mixture should fold in on itself when cut through with a spatula. You may not need all of the eggs.


5.  Spoon the pastry into a large piping bag fitted with a 1.5cm plain nozzle.


6. Pipe 10cm lengths onto a lined tray, allowing room for spreading. Sprinkle the baking tray lightly with water to create steam in the oven and encourage the puffs to rise. Bake for 12-15 minutes. Reduce the heat to 180°C and bake for a further 10-15 minutes, or until golden and puffed.

7. Transfer to a wire rack and use a small sharp knife to split each pastry in half to allow the steam to escape. Increase the temperature to 200°C and pipe the remaining choux pastry into 10cm lengths on the other lined tray. Cook the remaining pastries as before, then transfer to the wire rack and split in half. Allow to cool completely, then carefully remove any uncooked dough from inside each split pastry.

To make chocolate topping:

1. Melt the dark chocolate and white chocolate. Divide the white chocolate into 2 separate bowls. Add a drop of red colouring into one of them and mix until it turns pink.

2. Spread the eclair tops with the different colours of melted chocolate and lay them on a tray. Put them in the fridge for 10-15 minutes or until the chocolate is set. 

3. Remove the eclair tops from fridge and using a spoon, drizzle each top with a different colour of melted chocolate in zigzag pattern. Return to fridge to set.


To prepare the cream filling: 

1.  Lightly whip the cream and icing sugar until firm peaks. Do not overwhip. Using a piping bag with a star nozzle, pipe the cream onto the eclair bases. Place the chocolate covered eclair tops over cream and serve.


Tuesday, 12 August 2014

Nyonya Sago Coconut Kueh

My mother is a sago lover and this is one of her favourite sweet delicacies which she has requested me to make time and time again. I guess it's not difficult to see why. 

The combination of palm sugar, pandan and coconut milk brings out the beautiful flavour in this traditional kueh. Moist and flavoursome, not to mention the attractive different layers of colours, it just make this kueh simply hard to resist!


Nyonya Sago Coconut Kueh

Ingredients

(A)
400g Sago
300g Water

(B)

210g Grated White Coconut
220g Sugar
200ml Thick Coconut Milk
A pinch of Salt

(C)

100g Palm Sugar (Gula Melaka)
4 Tbsp Water
1 Tbsp Pandan Juice, extracted from Pandan Leaves


Method


1) Soak ingredients (A) for 30 minutes.


2) Melt ingredients (C) over low heat. Sift and set to cool.


3) Mix sago and ingredients (B) well and divide into 3 portions.


4) Add 1/4 tsp of pink food colouring to portion 1. Add in ingredients (C) to portion 2. Set aside portion 3.


5) Spread portion 1 evenly in a 7" square cake tin and press lightly with a spatula. Steam for 1/2 hour until the sago is transparent. Remove from steamer, and then pour in portion 2. Steam again and finally pour in portion 3 and steam for 30 minutes further.


6) Cool completely before cutting.


Strawberries Yoghurt Bavarois

This is the kind of sweet dessert that promises to bring a smile to the ones it's served to. It sure did when my girl was presented with one! Simple and easy to make and no baking required!


Strawberry Yoghurt Bavarois

Serves 8 

Ingredients 
15g gelatin powder
6 tbsp water
300g strawberries
1 tsp lemon juice
180ml milk
150g sugar
180ml heavy cream (thickened cream)
240ml plain yoghurt 

Method

1) Soak the gelatin in the water.

2) Wash and hull the strawberries, then drain.  In a bowl, mash the strawberries with a fork and sprinkle with the lemon juice.  (Alternatively, you can lightly blend the strawberries in your blender).

3) In a small saucepan, scald the milk and add the sugar and the gelatin-water mixture.  Stir gently until the sugar and gelatin dissolves.  Let cool.

4) In a bowl, beat the heavy cream till soft peaks form.   Add the mashed strawberries and stir well.  Add the yoghurt and gently stir.  Add the milk, sugar and gelatin mixture.

5) Pour into a large mould or several small individual moulds.

6) Chill in the refrigerator until set .  Serve with strawberry and whipped cream.


Monday, 11 August 2014

Apricot and Almond Tray Cake


When I first saw the recipe for this apricot cake in a cookbook by a Japanese baker, I couldn't help wanting to bake it immediately. The photo looks so tempting and it just beckons me to try it! The cookbook was printed in Chinese and I'm rather embarrassed to admit that my Chinese isn't the best. Nevertheless, I tried my hardest to understand what was written and being an avid baker, I managed to understand most of what's going on.

I'm happy to say the cake turned out beautifully and it tasted simply gorgeous! It was so good I baked another tray for my aunt who called back a few days later to say it was simply delicious ....

And guess what,  a few days later I found out that somebody else has tried the same recipe and posted it in her blog ... in English! Now why didn't I see that before!


Apricot and Almond Tray Cake
Recipe adapted from Happy Home Baking

Ingredients:
(makes nine 6cm squares)

100g unsalted butter (softened at room temperature)
30g caster sugar
2 egg yolks
1 teaspoon vanilla extract

2 egg whites
60g caster sugar

80g cake flour
40g + 30g ground almond (almond powder)

9 apricot halves (canned apricots)
some almond flakes


Method


  1. Wash the canned apricots to remove the syrup, drain, pat dry with paper towel and set aside. 
  2. Place butter in a mixing bowl, beat with a wooden spoon or a balloon whisk till smooth. Add the sugar and continue to beat until the mixture turns pale, light and fluffy.
  3. Gradually add in the egg yolks (a teaspoon at a time), whisking after each addition.
  4. Add in the vanilla extract, whisk to combine. Set aside.
  5. In a clean, dry mixing bowl, beat egg whites with a handheld electric mixer on low speed until mixture becomes frothy and foamy. Add half of the sugar and turn to high speed and beat the mixture. Continue to add in the remaining sugar and beat until the egg whites reaches the soft peak stage. The soft peak stage is reached when the peaks of the whites curl over and droop slightly. The egg whites should appear smooth and glossy.
  6. Add the beaten egg whites into the butter and egg yolk batter in 2 separate additions, each time folding gently with a spatula until just blended.
  7. Sieve over the flour and 40g of ground almond (almond powder). Fold with the spatula until just combined.
  8. Spoon half of the batter into a 18cm square pan (lined with parchment paper). Spread and smooth out the batter evenly. Arrange the apricots, cut side down.
  9. Add 30g of ground almond into the remaining batter. Fold with a spatula until just combined. Place batter into a piping bag (I used a plastic grocery bag). Snip off the tip of the piping bag and pipe the batter horizontally and vertically along the edges of the pan and in between the apricots. Sprinkle almond flakes on the surface of the piped batter. 
  10. Bake in preheated oven at 180C for about 30-35 mins or until the surface turns golden and a skewer inserted in the centre comes out clean.
  11. Remove from oven and leave to cool for about 5 mins. Unmould and transfer to wire rack, leave to cool completely.