Showing posts with label Cookies. Show all posts

Friday, 14 August 2015

Macadamia Chocolate Chip Cookies

I had a visit from my cousin from Melbourne last month and she gave me a pack of raw macadamia nuts. Well, what better way to use them than to make chocolate chip cookies? These cookies are just heavenly and you just can't seem to stop at one!


Macadamia Chocolate Chip Cookies

(makes about 24)

Ingredients

115g unsalted butter, softened
80g brown sugar
1 medium egg
1/2 tsp vanilla extract
1 cup all-purpose flour
1/4 tsp baking powder
1/2 tsp baking soda
1/2 tsp salt
1/2 cup rolled oats
1 cup bittersweet chocolate chips
1/2 cup chopped madacamia nuts


Method

1) Preheat oven to 180C.

2) Cream butter and sugar till light and fluffy. Beat in the egg and vanilla extract.

3) In another bowl, sift together flour, baking powder, baking soda and salt. Stir in oats.

4) Fold the flour and oat mixture into the batter.

5) Add in the chocolate chips and macadamia nuts and mix well together.

6) Using a rounded tablespoon, drop dough 5cm apart onto greased or lined baking trays. 

7) Bake the cookies for 12-15 mins or until golden.

8) Cool for 5 minutes then transfer to wire racks.


Monday, 9 February 2015

Valentine Cookies

Valentine's Day is just around the corner and these delicious "shortbready" custard cookies are just the perfect gift for your loved ones.  And what's more they are homemade with love!

Decorated with pretty ribbons and strings, I'm sure they will bring a smile of delight to the ones who receive them ....

Happy Valentine's Day!


Valentine Cookies

Ingredients

100g butter
80g icing sugar
1 egg
220g plain flour
1/4 tsp baking powder
30g custard powder


Method

1) Preheat oven to 180C. Line a baking tray with baking paper.

2) Beat butter and icing sugar till creamy.  Add in the egg and continue to beat until light and fluffy.

3) Sift in the flour, baking powder and custard powder.

4) Mix together and knead lightly into a dough. 

5) Roll the dough between two sheets of baking paper until about 8mm thickness.

6) Use a heart-shaped cookie cutter to cut out shapes. Using a straw, poke two holes in the centre of the cookies. Place them onto the baking tray.

7) Bake cookies for 15-20 minutes. Remove from oven and leave to cool on a rack.

8) Stack a few cookies on top of each other. Run a ribbon or string through one of the holes of the top cookie all the way down to the bottom cookie and then through the other hole of the bottom cookie and string it all the way up again. Tie the two loose ends of the ribbon/string into a pretty bow on top of the cookies.


*******************************************************************************

If you would like to decorate your heart cookies with icing, you can try this runny icing:-

Royal Icing

Ingredients
1 egg white
1 tsp lemon juice
8-10 heaped Tbsp icing sugar
food colouring

1) Place the egg white in a mixing bowl. Add the lemon juice and one heaped Tbsp of icing sugar. Stir with a spoon (do not use an electric beater. You are mixing, not whipping the egg white). Continue adding the icing sugar spoon by spoon until you get a white icing, which should be runny, but not watery.
   
2) You will need 8-10 Tbsp of sugar, depending on the size of your egg white. Always have some icing sugar on the side in case you need more, and if the icing becomes too thick, add a teaspoon of water to thin it down. You can mix in food colouring of your choice.

3) Spoon the icing directly onto your cookies and use the back of the spoon to smoothen it around. Leave aside to harden.


 Homemade with love ...


Sunday, 8 February 2015

Kuih Bangkit (Tapioca Cookies)

Kuih Bangkit is another one of our all time favourite Chinese New Year cookies. I got a couple of new sea shell moulds from my sister this year and they are just perfect for these cookies as they are white in colour and look just like the real sea shells!


Kuih bangkit shells on a bed of sandy brown sugar!


Love these sea shell moulds!


Kuih Bangkit
(Recipe by Kevin Chai)

Ingredients
3 egg yolks
120g castor sugar
150ml thick coconut milk
400g fried tapioca flour *

* Fry the tapioca flour with 3 pandan leaves (cut into 4cm pcs) in a wok or pan on low heat till light and dry (about 40 mins). Leave to cool overnight.

Method
1) Beat egg yolks and castor sugar in the mixer with a whisk. Beat until light and fluffy, then add in coconut milk slowly and mix until well combined.

2) Sift the tapioca flour in a mixing bowl, add in coconut milk mixture slowly and mix until resemble crumbs. Cover with a wet kitchen towel.

3) Prepare a wooden mould, dust some tapioca flour in the mould, fill the mixture in the mould, press firmly. Knock out the cookies and arrange and arrange on a lined baking tray with baking paper. Decorate with red spot.

4) Bake in the preheated oven at 180C for 15-20 minutes. Dish out, leave to cool and store in airtight containers.


Monday, 26 January 2015

Dragon Cookies

I love these dragon cookies as they have such a buttery and milky taste that simply melt in the mouth.  Another must have for Chinese New Year!


Dragon Cookies
(makes about 30 pcs)

Ingredients

60g butter
60g icing sugar
2 egg yolks
5g custard powder
10g milk powder
135g cornflour
red colouring

Method

1)  Beat the butter and icing sugar until creamy and fluffy. 

2) Add in the egg yolks and beat until combined.

3) Fold in custard powder, milk powder and cornflour and mix to form a soft and pliable dough. (If dough is too wet, add a bit more cornflour)

4) Put a star nozzle into a thick piping bag.  Fill it with some of the dough (do not fill in too much for easier piping) and pipe out "S" shaped patterns on a baking tray lined with baking paper.  Dot eyes with red colouring.

5) Bake in a preheated oven at 160C for about 15 min or till light yellow.


Please note:

1) Cover the batter in the bowl with a wet cloth while you are piping out the patterns as the batter tends to harden up due to the cornflour.

2) If the batter does harden up, add a little bit of water to soften so that it's easier to pipe out.


I use a Wilton nozzle 32 to pipe out the cookies


Thursday, 15 January 2015

Cashew Nut Cookies

Chinese New Year is always an exciting time as there are so many delightful and tempting goodies that come with this festive season.

One of my favourite bites is cashew nut cookies and I must say it's on my baking list every CNY.  Rich, flavoursome and full of nutty goodness, it's definitely a must-have!


Cashew Nut Cookies

Ingredients
250g butter
180g icing sugar
400g plain flour
1 tsp baking powder
180g ground cashew nuts
1 egg yolk
1 tsp vanilla extract
100g cashew nut halves, for garnishing

Egg wash
1 egg yolk, lightly beaten


Method

1) Preheat oven to 150C.

2) Sift plain flour and baking powder together.

3) Cream butter and icing sugar together. Add in egg yolk and vanilla extract.

4) Add in the flour and ground cashew nuts. Mix well until dough forms.

5) Roll dough to 1/4 inch thickness and cut into desired shapes using cookie cutter.

6) Press a cashew nut on top of each cookie and brush with egg wash.

7) Bake at 150C for 20-25 minutes or until golden brown.


My stack of Golden Stars!


Wednesday, 27 August 2014

Moo Moo Milk Cookies

Once in a while, I like to make interesting snacks to surprise my daughter when she comes home from school in the afternoon. It always makes me smile to see her face light up when she sees those surprise snacks.

These adorable cow cookies are one of those treats that I made to surprise her. They are fun to make and taste absolutely yummy too!


Moo Moo Milk Cookies

Ingredients

100g butter
80g icing sugar
1 egg
220g plain flour
1/4 tsp baking powder
30g custard powder
1 Tbsp milk powder

black food colouring

Method

1) Preheat oven to 180C. Line a baking tray with baking paper.

2) Beat butter and icing sugar till creamy.  Add in the egg and continue to beat until light and fluffy.

3) Sift in the flour, baking powder, custard powder and milk powder.

4) Mix together and knead into a dough. 

5) Roll the dough between two sheets of baking paper until about 8mm thickness.

6) Use a cow-shaped cookie cutter to cut out shapes and place onto the baking tray.

7) Using a toothpick, dip it into black food colouring (you may also use cocoa powder diluted in hot water, but I find the effect using black colouring is better) and dot patches of black colour onto the cookie dough.

8) Bake cookies for 15-20 minutes.

Have fun and enjoy!

Saturday, 16 August 2014

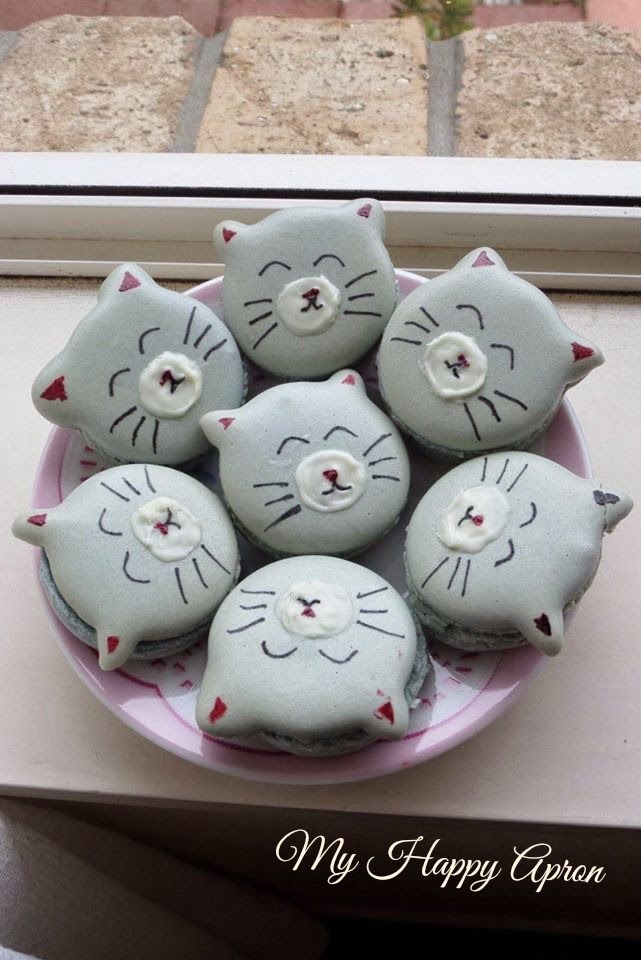
Kitty Macarons

A while back, my daughter came home from school asking for my help with her homework.  Her assignment was to prepare a food item, package it and advertise it to its best advantage. Hmm .... now what shall we prepare then? Cookies? Cupcakes? Brownies? ......  Ahhh .... Yes! Macarons!! That should be exciting! And to make our product more attractive we decided to make kitty macarons. Aren't they just adorable?


Colourful and cute kitty macarons

Meow meow meow ....

All packaged up with advertisement and ready to sell!


We had a busy but fun-filled weekend preparing the macarons and drawing cute kitty faces. Now why can't homework be this fun all the time?


Kitty Macarons
(Basic Macaron Recipe adapted from Macaron Fetish)

Yield about 24 macaron shells (12 filled macarons)

Macaron Shells
1 room temperatured egg white(39-40g)
50g icing sugar
30g ground almond
30g castor sugar
Drops of food colouring

Method:
1. Put ground almond and icing sugar in a food processor or a small blender. Blend them finely.

2. Sift the blended mixture and set aside.


3. With an electric beater, Beat the egg white, start from low speed and increase slowly to maximum speed. Beat until frothy (you will see lots of fine bubbles)

4. Now it's the time to add in the castor sugar, add half of the sugar, continue to beat in maximum speed for around 2 minutes, add in the other half, continue until you get very stiff peak.

5. Mix the dry ingredients into the eggwhites. This process is called Macaronage. Start folding with a rubber spatula. Add in drops of food colouring but not too much as it will cause the mixture to become too runny. When you get a smooth shiny mixture, stop folding, lift the mixture with spatula, if the mixture falls back slowly in the bowl means you're good to go. You could also check if the lines formed from the liften mixture, they should slowly disappear in within 30 seconds. At this stage you're good to go. Do not over fold, it will be too liquid and becoming very hard to pipe.

6. Line the baking tray with the parchment paper.

7. Fill your piping bag , pipe your macaron (about 2 cm diameter) it should spread a bit as it settles. The point should slowly disappear if the mixture is the right consistency.
If not you could hit the bottom of the tray to smooth the point out)


8. To make kitty macaron, I just use a toothpick to pull the batter slightly upwards to form two pointy ears.

9. Let your macaron sits for about 30minutes. This will depand on the humity in your house and the day. Try touching the macaron softly, after 30mins. it should not stick to your hand.

10. Heat your oven to 150 C on the (heating on the top only). When the oven is ready, put your macaron at the very bottom shelf. Bake for 12 minutes, check them in the mid time of 6 minutes, the feets should already start forming. Turn the baking tray to the opposite direction to allow even baking. When the 6 mins is up, change the heating setting of your oven to Bottom only. This will help cooking the macaron and rise the feet more. Bake for another 6 minutes. You can test if the macaron is cook, touch softly on the shell and when the macaron doesn't slide on the feet, it's cooked. if it's not add another 1 mins each time and check.

11. Let the macaron cool down before removing them. You could wet your working area and slide the baking sheet on it to speed up the cooling process, but do not let it sit there too long, if not the macarons will become soggy. Other wise you can leave them cool at room temperature and remove them.

12. To make kitty faces, use a toothpick to dip into black food colouring and draw on the macarons.


White Chocolate Ganache Filling
50g white chocolate
25ml fresh cream

1. Warm the cream over the stove, until it boil very slightly.

2. Remove the cream from heat, Add white chocolate, mix until the chocolate is melted completely and a smooth texture is obtain.


3. Refrigerate until firm and spread between the macaron shells.


Have fun and enjoy!

Friday, 15 August 2014

Rock Buns

Many years ago, not long after I started on a new job, I made some rock buns and brought them to work to share with my colleagues during tea break. My boss came over and I offered her some too. She tried one, ... said they were delicious, ..... couldn't help taking another, .... and then another. I guess they must have been addictive! They say the way to a man's heart is his stomach. I wondered then if it works the same for a boss?


Something quick, simple and easy to make to fill your cookie jar


Rock Buns
(Makes 20)

240g plain flour
2 tsp baking powder
90g butter, softened
90g castor sugar
120g sultanas
1 medium egg, lightly beaten
1 Tbsp milk
1 Tbsp castor sugar, extra

1) Preheat oven to 180°C. Line oven tray with baking paper.

2) Sift flour and baking powder into a large mixing bowl. Lightly rub in the butter with fingertips until the mixture resembles fine breadcrumbs. 

3) Add in castor sugar and sultanas, and mix until well incorporated.

4) Add in the beaten egg and milk and mix together to form a thick, lumpy dough. (If dough is too dry, add a teaspoon more milk to make the mixture stick together).

3) Drop rounded tablespoon of mixture about 5cm apart onto trays and sprinkle with extra sugar.

4) Bake for 15 minutes or until golden brown and well risen.

Stored in airtight containers, they can keep for up to 3 days.